Cricut Maker & Simplicity Tank Top Doll Dress - @Cricut
- Rosie
- May 17, 2018
- 5 min read
Updated: Aug 2, 2020
This post contains affiliate links for Cricut Products which are highlighted in green. If you choose to make a purchase using these links, I receive a small commission at no additional cost to you.

Hi Everyone! As some of you may know, Cricut has formed a partnership with the Simplicity pattern company, so now you can find some of your favorite sewing patterns on Cricut Access. This is great news for sewers because we can now purchase patterns right from our computers and send them straight to the Cricut Maker for cutting. There is no more running out to the store to buy the pattern; no more pinning the pattern pieces to the fabric; no more cutting; no more working with tissue thin pattern pieces!! Simply lay your fabric down on the mat, and load into the Cricut Maker for cutting. And may I ad that despite decades of sewing experience, I could never cut as accurately as the Maker with the amazing Rotary Blade. The pieces are cut so precisely which makes lining up your notches, dots and seams so easy. So, let's go download a pattern and start sewing!


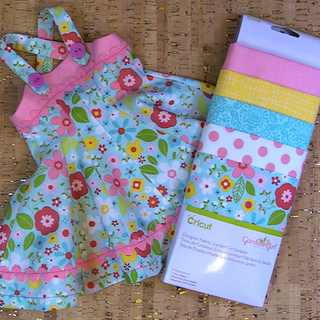
I am using the Simplicity Tank Top Doll Dress. You can locate it in Cricut Access by clicking the Ready-to-Make projects drop down menu located in the upper right corner of the screen and then typing "Tank Top Doll Dress" in the search box to the right.

You will need to purchase the pattern, but once you have the project on the screen, you can review the Detail Sheet which gives you all the important information you need to know before you make the purchase including: a description of the project, skill level, materials needed and preparation.

You can also take a look at the Assembly Instructions by clicking on the PDF at the bottom of the detail sheet.

After you have purchased your project, you can start loading your mats for cutting. You will find the instructions for precutting your fabrics in the Preparation section of the Detail Sheet for the project. In addition to cutting your pieces, the Cricut Maker will also be marking all the circles and lines necessary for assembly onto your fabric. I like to have my markings on the wrong side of the fabric, so I place the fabric right side down on the mats. If you prefer your markings to be on the right side of the fabric, then place your fabric right side up on the mats. I also like to keep my fabric within the outer grid lines of the mat as I do not want any materials to interfere with the black rollers on the Maker as they ride up and down the sides of the mat.

Once you are finished setting up your mats, you will be ready to start cutting. On the Detail Sheet for the project, choose "Make It" in the lower right hand corner. You will be taken directly to Design Space where you will see all your mats sorted and ready to cut. It will ask you to choose your material type. I used 100% cotton fabric, so I chose the Cotton Fabric setting.

You will be asked to install your Washable Fabric Marker and the Rotary Blade. Make sure you have both of these tools installed in the Cricut Maker before you load your mat. No worries if you forget to put in the Rotary Blade. The Maker will check to see if you have the right blade installed before cutting and will give you the opportunity to install the correct blade if you need to.

The next step will be to load your mats into the Cricut Maker. Design Space will guide you through every step! Just follow all the on-screen instructions. Be mindful of which mat Design Space is asking you to load since the fabric you pre-cut to load on the mats are not all the same length.

The next step is always pure magic for me; the moment I reveal the cut pieces. Simply grab the fabric from any corner and start peeling back gently! I am always amazed to see the wonderful job the Cricut Maker does. All my pieces perfectly marked and cut with great precision!!

Now you are ready to start assembling the dress. You can follow the PDF instruction sheet which outlines all 12-steps for construction. I have also prepared a video tutorial which gives detailed, step-by-step instructions starting with how to access the project, preparing the fabric mats, cutting the pieces and construction. I am also giving you timestamps for the video so you can feel free to skip to the sections you need to view. You will find a link to the video HERE or at the top of this post and you can find the Timestamps at the bottom.
Sew all your seams 1/4" from the edge of the fabric. If you have a 1/4" piecing foot, now is a good time to use it. I sewed all my seams with a 2.0 stitch length except for attaching the rick rack where I used a 2.4 stitch length.
When constructing the dress, make sure to match all your notches. This will ensure that you are pinning the correct pieces together and that you have aligned them properly.

Iron all your seams in the direction that the instructions tells you to. For example, the seams for the front of the dress are ironed toward the center front while the center front seam is ironed open. I am using the Easy Press Ironing Pad to iron my seams. Although this pad was designed to use with the Easy Press, it is handy to have next to your sewing machine when you need to do a little pressing.

Clip all your curved seams with a small "v", but be careful not to cut into your seamline.

I used an Elmer's Washable School Glue stick to temporarily hold down the rick rack while sewing. The glue will wash out, but you can also pin the rick rack in place if you prefer.

I use small pieces of velcro for the dress closure in place of sewing buttonholes. If you choose to use the velcro, simply place the velcro pieces where the buttonholes are marked on the dress and stitch in place.

I had a lot of fun making this dress. The Cricut Maker makes it so easy with it's very precise cutting! I hope you will give this a try and Happy Sewing!!
Timestamps for the video:
Introduction - 0:00
Getting Started - 0:39:15
Accessing the File: 1:05:23
Overview of File: 1:52:22
Fabric Preparation: 03:18:04
Setting Up the Mats - 04:48:06
Inserting Rotary Blade and Washable Marker - 6:52:19
Cutting the Fabric Mats - 8:10:11
Removing the Pieces from the Mats - 12:47:03
Constructing the Dress - 14:22:09
Sewing the Dress Front - 15:12:26
Sewing Dress Back & Side Seams - 21:28:20
Adding Rick Rack - 24:17:15
Attaching the Back Facing - 26:50:06
Sewing the Hem - 31:36:04
Sewing the Front Band - 33:05:27
Sewing the Band to the Dress - 33:31:17
Stitch Rick Rack to Band - 3:31:25
Sewing the Shoulder Straps - 36:56:06
Sewing the Band Facing to the Dress - 38:57:24
Attaching the Buttons - 40:44:14
Comments